Help Book
Welcome to the Help Book.
Place/hold the iOS device to the vibrating part of your vehicle, such as your dashboard, and press Sample!
Quick Start
This is how to get you started, if you know the gear and
final drive ratios.
it’s important to understand that if you enter the wrong gear ratio
information, the vibration detection using GPS will fail. I.e. Detecting what
your RPM gauge is showing will not be correct. However, as long as you enter
the correct tire size - your tire vibrations, T1, T2 and T3, will always be
detected correctly:
1. Find out your tire size and enter it on the Car Data tab, make sure you've selected GPS mode in the Settings view
2. Find out your gear ratio
3. Hold/put the iPhone or iPad so that it has good contact with the car. Select, in the app, the gear used and press "Run Analyze"
4. Drive so that your vibrations occur, try to keep a steady speed
5. Analyze and view the results. All vibrations under 15 mg should generally be disregarded.
Quick start video Note that the iPhone app is used, and that some things could differ
Tires
It's very easy to enter tire information in the app. Just look at you tires and enter what you see. For example, tire width is 185, height 65 and wheel size is 15 inches. Width is in mm. Height is in percentage and wheel size is in inches.
Finding gear ratio
Gear ratio is commonly mentioned in the owner's handbook or the service manual for your car. Online sources include:
· www.cars-data.com (Most cars)
· www.bokchoys.com (BMW 3-series)
· wikipedia.org/wiki/Toyota_U_transmission (Toyota)
The numbers need to be correct for
the app to function. If you can not find it, you may call your local brand shop
and they will be required to give you that information. The gear ratio, coupled
with the GPS speed, is the best and simplest way to analyze your vibrations. A
'GPS w/o Gear' mode exist, where drive the car to a chosen engine RPM yourself,
and then input that engine RPM into the app. 
Figure 2. General owner's manual
Mounting help
Cases are generally not a problem.
But if problems getting any significant vibration, try removing case and
relocate the iOS device. For instance, door panel. Or you can hold it against
the dashboard. Best is to attach it to a windscreen mount that touches the
dashboard.
One option is to just put the iOS device on the component that is vibrating,
like an arm rest. 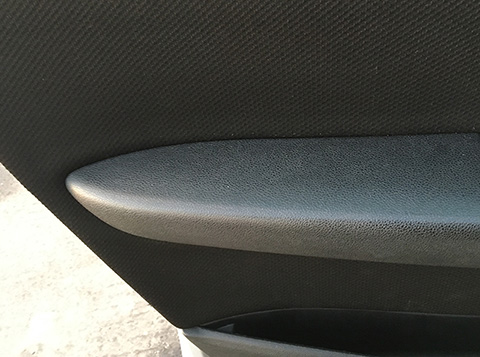
Figure 3. Door with arm rest A common windshield mount will often work
Analyze View help
X-axle is in RPM. RPM is also a frequency unit, namely
Hertz times 60.
Y-axle is in mg. m G as in milli G-force. You don't have to adjust or calculate anything,
they're just there to help you understand what you are seeing. Adjustment
are done when sampling is done. For Manual mode it's possible
to adjust the engine RPM while sampling. The
vibration points are frequencies which stand out.
Selection of current gear
In the Analyzer View, there's also the gear selection. You should select the gear that was active during the "Sample". When selecting a gear, all the slider settings are restored
Settings View help
Mode is only affecting how the vibration points is calculated, wither manually or using the build in GPS
Modes
There are two modes in which you can sample.
· GPS mode - Engine RPM is calculated form vehicle speed. "RPM:" label will update.
· Manual mode - Engine RPM needs to be entered if you want to see any vibrations. Please use the slider! “RPM:” slider will be updated according to your selection and the vibration points will shift in frequency as you slide back and forth.
In the Manual mode, a slider will appear. This is because the app CANNOT compute
the engine RPM without gear ratio information
NOTE: If you stick with GPS mode, enter correct gear ratios and drive at a
steady speed - no extra slider is required.
NOTE: You can measure just engine vibrations by selecting the Manual
mode, and then N as active gear. This also deactivates the GPS function. You
should also select Manual mode. You then need to enter the engine RPM manually
by double clicking on the slider, or sliding it.
Red Points
X-axle is in RPM. RPM is also a frequency unit, namely Hertz times
60.
Y-axle is in mg. m G as in milli G-force.
The Red Vibration Points is
frequencies which should be watched. If you have a spike in the green FFT graph, that does not have a red point over it, then
you have entered wrong gear ration and/or tire sizes. Or you are accelerating while sampling (="Run Anlyze")
For Manual mode it's possible to adjust the engine RPM while sampling. If you see a spike in the green FFT graph, and there is a red point over it,
that means that that particular point is you problem area. Below, in the Vibration Reference section, you can check out different solutions and causes of your vibration problem.
Vibration Sources
Pictured below is a simplified image of the different drive systems present in most vehicles. Note that the color on the component correlate to the Red Vibration Points presented by the app. The most common misunderstanding are that the Prop Shaft vibrations just refer to all shafts. That is no the case. The order at which the component vibrates depend at which speed it rotates. Thus, a T1 vibration could be a drive shaft / half shaft that is out of balance.
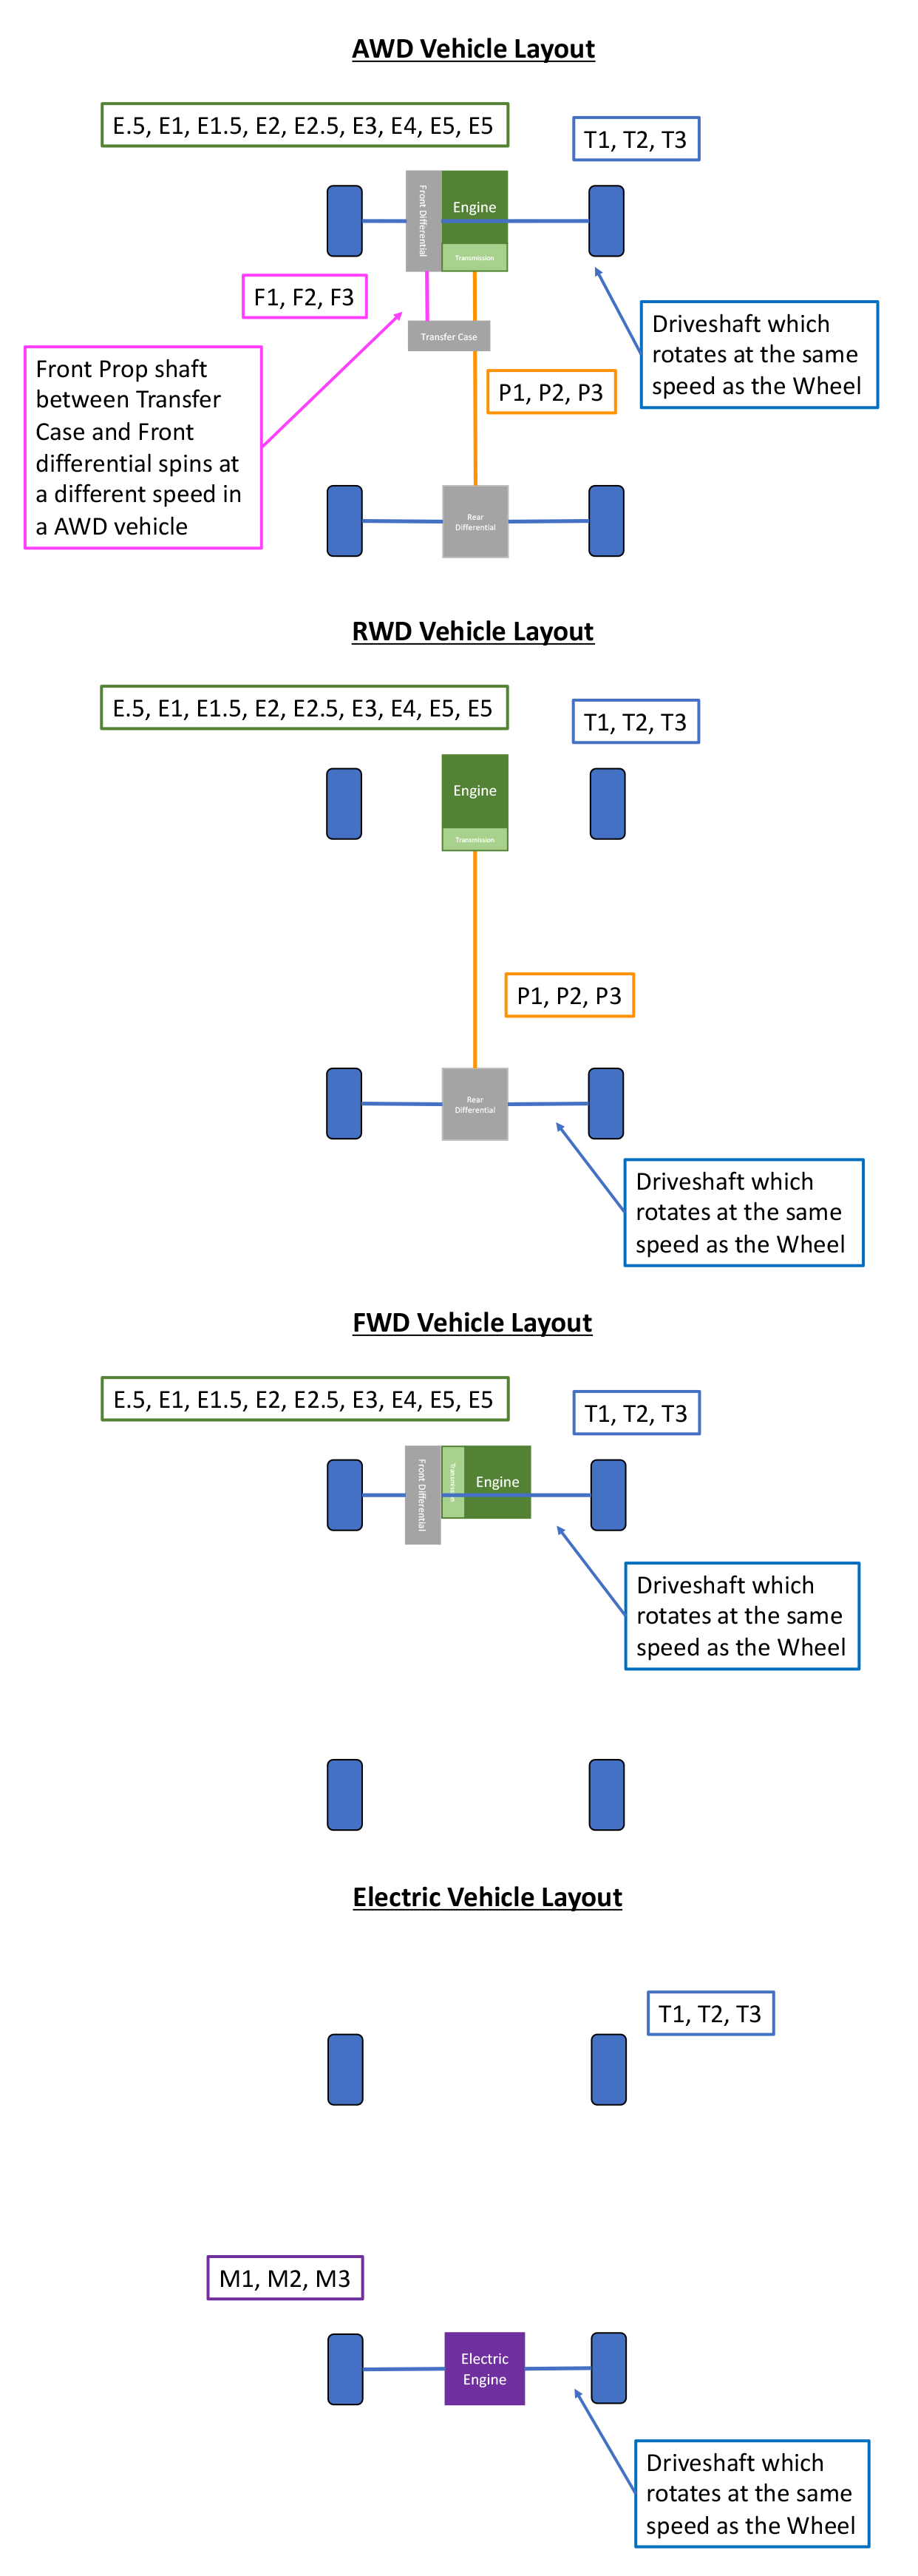
Figure 4. Different drive systems layouts, and the potential vibration sources
Blue parts are the Tire/Wheel with the attached driveshaft. Note that the driveshaft rotates at the same speed as the Tire/Wheel.
Orange parts is the rear Prop shaft. Note that the rear Prop shaft is only between the Transmission and the rear differential
Green is the Engine. Note that the engine can vibrate at many different frequencies depending on the model and problem at hand.
Pink parts is the Front Prop Shaft connecting the Transfer case to the Front Differential. Note that the shaft going from the front differential to the wheel would vibrate at the T1, T2 and T3 vibration speeds.
Vibration Reference
E.5 - Half order engine vibrations
Half order engine vibrations are half the rate of the
engine speed.
Disproportionate vibrations can be a sign of the following problems:
· Misfire
· Camshaft related problems
E1 - First order engine vibrations
First order engine vibrations are the same as the engine
speed. First order engine vibrations are not commonly encountered while
driving. These vibrations are actually normal on 5-cylinder inline,
3-cylinder inline and V6 engines.
Possible causes:
· Worn transmission/engine mounts
· Worn vibration insulation between cabin compartment and chassis
· Cracks or defects in flywheel, flexplate or Torque Converter
· Vibration damper, located on the flywheel
E1.5 - First and a half order engine vibrations
First and a half order engine vibration is the same as the
engine speed times 1.5. First and a half order engine vibrations are actually normal
on 3-cylinder engines. Excessive vibrations of this order could be cause by
worn motor or gearbox mounts.
Possible causes:
· Worn transmission/engine mounts
E2 - Second order engine vibrations
Second order engine vibrations vibrate twice the engine speed. Second order engine vibrations are actually normal, on inline 4-cylinder engines and V6 engines. Possible causes:
· You are riding in a too low gear
· Worn transmission/engine mounts
E2.5 - Second and a half order engine vibrations
Second and a half order engine vibration vibrates twice the engine speed plus half the engine speed. Ie. 2.5 times the engine rpm. Second and a half order engine vibrations are actually normal on inline 5-cylinder engines. Possible causes:
· Worn transmission/engine mounts
E3 - Third order engine vibrations
Third order engine vibrations vibrate three times the
engine speed.
Third order engine vibrations are actually normal on 6-cylinder engines.
Possible causes:
· Worn transmission/engine mounts
E4 - Fourth order engine vibrations
Fourth order engine vibrations vibrate four times the
engine speed.
Fourth order engine vibrations are actually normal on 8-cylinder
engines. Possible causes:
· Worn transmission/engine mounts
E5 - Fifth order engine vibrations
Fifth order engine vibrations vibrate five times the engine
speed.
Fifth order engine vibrations are actually normal on 10-cylinder
engines. Possible causes:
· Worn transmission/engine mounts
E6 - Sixth order engine vibrations
Sixth order engine vibrations vibrate six times the engine
speed.
Sixth order engine vibrations are actually normal on 12-cylinder
engines. Possible causes:
· Worn transmission/engine mounts
T1 - First order tire vibrations
First order tire vibrations are one "bump" for
each rotation of the wheels.
Can be a sign of the following problems:
· Wrongly mounted wheel. Check that lug nuts / bolts are tightened in correct order
· Tire pressure is off, and not as recommended. Make sure that the tire pressure is the same as stated in the owner's manual
· A rim, and or tire that is not completely round. Check using a wheel balancer, or by inspection
· A rim, and or tire that is unbalanced. Check using a wheel balancer, or by inspection. NOTE: Not all wheel balancer does a good job on this
· A tire with hard points/areas in the sidewall. Replace tires
· Prop shaft/axle problems Note: For FWD cars, T1, T2 and T3 could be driveshaft issues. Se Figure 4. That means you should consider P2 as a possible problem if you see a T2.
If wheel balancing has been performed, with little results, do a matching. It's the process of balancing the rim and tire, together, and produce a much better result. High-end German cars needs this type of balance for a quality ride.
T2 - Second order tire vibrations
Second order tire vibrations are two "bumps" for
each rotation of the wheels. Note that a regular wheel balance only takes care of T1 vibrations, ie. balancing out the first order vibration.
Can be a sign of the following problems:
· Tire pressure is off, and not as recommended. Make sure that the tire pressure is the same as stated in the owner's manual
· A tire or rim that is not completely round. Check using a wheel balancer, or by inspection. NOTE: Not all wheel balancer does a good job on this
· A tire with hard points/areas in the sidewall. Test with another set of quality tires and replace tires if necessary
· Prop shaft/axle problems Note: For FWD cars, T1, T2 and T3 could be driveshaft issues. Se Figure 4. That means you should consider P2 as a possible problem if you see a T2.
If wheel balancing has been performed, with little results, do a matching. It's the process of balancing the rim and tire, together, and produce a much better result. High-end German cars needs this type of balance for a quality ride.
T3 - Third order tire vibrations
Third order tire vibrations are three "bumps" for
each rotation of the wheels.
Can be a sign of the following problems:
· A tire or rim that is not completely round. Check using a wheel balancer, or by inspection. NOTE: Not all wheel balancer do a good job on this.
· A tire with hard points/areas in the sidewall. Test with another set of quality tires and replace tires if necessary.
· Binding or broken CV Joints (Could exist in the prop shaft or half-shafts), Tripod joint. Check if play and replace if necessary.
· Incorrect angles of CV-joints. Check vehicle ride height.
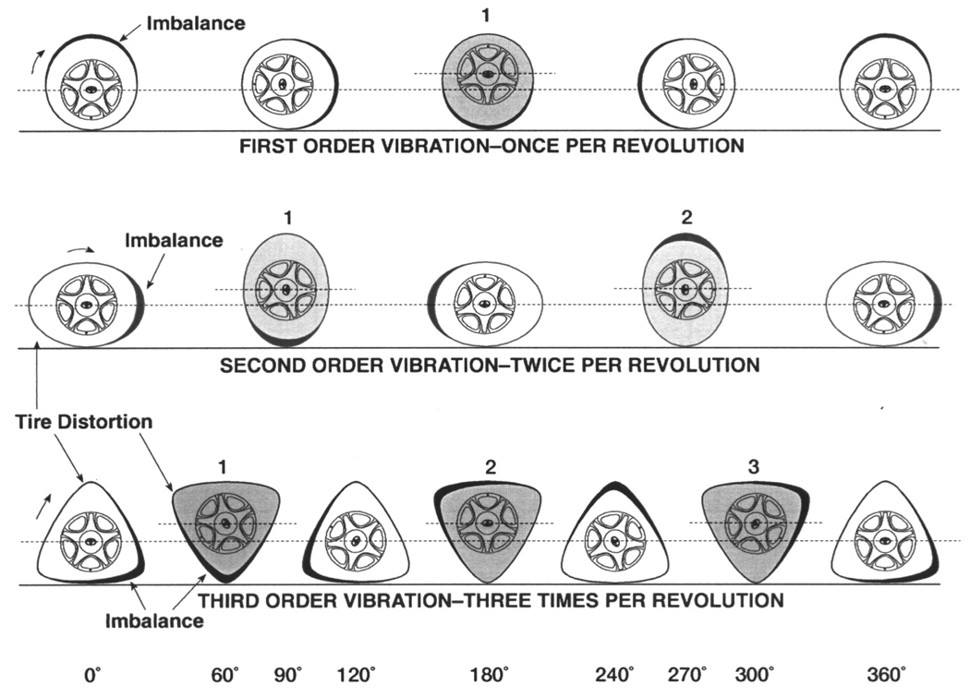
Figure 5. Tire vibrations. Note that it could be hard spots in the rubber, force variation in the rubber or a bent rim.
T6 - Sixth order tire vibrations
Sixth order tire vibrations are six "bumps" for
each rotation of the wheels.
Can be a sign of the following problems:
· A tire or rim that is not completely round. Check using a wheel balancer, or by inspection. NOTE: Not all wheel balancer do a good job on this.
· A tire with hard points/areas in the sidewall. Test with another set of quality tires and replace tires if necessary.
· Binding or broken CV Joints, Rzeppa joints. Check if play and replace if necessary.
· Problem with wheel bearings (rare)
P1 - First order prop shaft vibrations
A component that has one "bump" rotating the same
speed as the prop shaft. A P1 vibration should generally be present during many diferent vehicle speeds.
Can be a sign of the following problems:
· Unbalanced prop shaft. Balance prop shaft
· Run out of prop shaft. Check prop shaft for run out and balance
· OBSERVE: A Final Drive Ratio of around 2.90:1 to 3.10:1 could have the same frequency as T3 vibrations. We recommend changing to a set of known good wheels, and doing a new measurement.
· OBSERVE: P1, P2 and P3 apply to Prop Shafts, not Half Shafts / Drive Shafts. Prop Shaft is the shaft connecting the output from the transmission to the final drive.
P2 - Second order prop shaft vibrations
A component that has two "bumps" rotating the
same speed as the prop shaft.
Can be a sign of the following problems:
· Wrong vehicle ride height above ground. Measure using s ruler while car is placed on a flat surface
· Worn transmission/engine mounts
· Wrong working angle of prop shaft and/or wrongly aligned prop shaft
· Universal joint related problems
· Other prop shaft related problems. Note: For FWD cars, Tire and Prop shaft vibrations should be considered, se Figure 4.
P3 - Third order prop shaft vibrations
A component that has three "bumps" rotating the
same speed as the prop shaft.
Can be a sign of the following problems:
· Excessive working angles of the CV-joints. Measure using s ruler while car is placed on a flat surface
· Excessive play in CV-joints or binding CV-joints (If they exist in the prop shaft), usually if the CV joint is a Tripod joint. Check if play and replace if necessary.
· Other prop shaft related problems. Note: For FWD cars, Tire and Prop shaft vibrations should be considered, se Figure 4.
Generally, regarding vibrations
With and incorrect ride height, caused by a broken or damaged damper or spring, unrelated vibrations like T2, T2, T3, may grow. Make sure the dampers pass the damper test and that the springs are not rusted/broken in the ends.
Further reading
Basics on NVH (slide 79 esp.) from Rousch Industries, Texas